Menu
    • Menu
    • Order Custom Inserts
    • SALES
    • Shop
      • Menu
      • Custom Light Bar Kits
      • Dual Row Light Bars
      • Single Row Light Bars
      • Light Bar Covers
      • Light Bar Insert Shades
      • Light Bar Mounting Brackets
      • Apparel
      • LED Remote/Wiring/Modules
    • Product Help!
    • Shop By Vehicle
      • Menu
      • Custom Jeep Light Bars
      • Jeep JL Products
      • Jeep JK Products
      • Jeep JT Products
      • ATV & Off-Road Products
    • Blog
    • Info
      • Menu
      • About Us
      • Reviews
      • FAQ
      • How To
    • Contact
    • DEALERS
      • Menu
      • Login
      • Dealer Sign Up
    Helpline: (314) 279-5636
    • Hello. Sign in | Register
    Aerolidz
      Helpline: (314) 279-5636
      • Shopping Cart 0
        Your Cart
      Menu
      Aerolidz
      Aerolidz
      0
      • Order Custom Inserts
      • SALES
      • Shop
        • Menu
        • Custom Light Bar Kits
        • Dual Row Light Bars
        • Single Row Light Bars
        • Light Bar Covers
        • Light Bar Insert Shades
        • Light Bar Mounting Brackets
        • Apparel
        • LED Remote/Wiring/Modules
      • Product Help!
      • Shop By Vehicle
        • Menu
        • Custom Jeep Light Bars
        • Jeep JL Products
        • Jeep JK Products
        • Jeep JT Products
        • ATV & Off-Road Products
      • Blog
      • Info
        • Menu
        • About Us
        • Reviews
        • FAQ
        • How To
      • Contact
      • DEALERS
        • Menu
        • Login
        • Dealer Sign Up
      • AerolidzHome
      • Blog
      • How to Wire a Light Bar
      Article

      How to Wire a Light Bar

      • By Notch Solutions
      • on July 20, 2021
      • Categories: Blog

      Have you recently purchased a light bar for your jeep or SUV?  If so, congratulations!  A quality light bar is a critical piece of equipment, particularly when you are driving at night or want to go off-roading!  Now that you have made the investment, you need to make sure you install it correctly.


      Below, we are sharing some tips for installing your new light bar. Rest assured, this is usually a simple process, made even easier because LED light bars are relatively lightweight. You should be able to install your light bar either by yourself or with the assistance of a friend.


      First, check your light bar package and ensure that you have all the pieces. You don’t want to begin only to learn you are missing that last critical component because of a packaging error.  


      Once you have laid out all the parts, make sure you have, on hand, the appropriate tools for the job.  While simple to install and wire, you do need to have some basic items.  For installation, you need wrenches, pliers, and screwdrivers, as well as a measuring tape.  You may also want to have some clamps on hand to hold the bar still when determining where to drill holes. 


      When you are ready to wire you will use wire strippers and cutters as well as crimpers.  Make sure they match your connectors. You may also need tape and caulking as well as wire ties. 


      Test Your Light Bar before installing!

      Before you actually begin the installation, test your lightbar and ensure it works. You can do this by connecting it to your car’s battery.  If it doesn’t work, you can do an exchange before you waste time installing something broken.


      Some important tips for the actual wiring start with a relay. Generally, they can handle a higher load than switches so they won’t overheat.  Their voltage drop is less and, when used with a single control switch, you can use lights simultaneously. 


      For some inexpensive protection for your vehicle’s electrical system, we also suggest the use of a fuse with the right amp rating.  Benjamin Franklin once said, “An ounce of prevention is worth a pound of cure.”  And nobody knew electricity like he did.

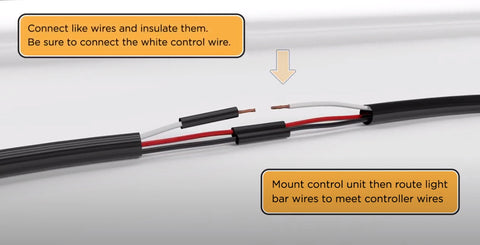
      Step 1: Mount control unit then route light bar wires to meet the controller wires.

      step 2: Light Bar Controller Unit

      controller unit should be located in a suitable spot with an unobstructed view of the rf remote the switch wire can be routed through the firewall to switch location inside cab.

      Step 3: Wire Switch Cable inside Cab of your vehicle

      Wire the switch cable inside the cab of your vehicle. Many people cut a small hole somewhere in reach of the driver using a drill or a Dremel and insert the button inside. 

      Also, ensure the inline fuse is installed and not broken.

      Step 4: Connect the negative then positive wire to the battery


      Special Notes:

      If you have an aftermarket switching system, cut off the two toggle switch wires and splice them together. Then you can connect the positive battery wire from the harness to your switching system


      If the remote doesn't work. Pull in-line ruse to reset the control module. Once you've downloaded and opened the app. Select led dmx and it should connect automatically.

      • All
      • Twitter
      • Facebook
      About Author
      Admin

      Notch Solutions

      Blogger & Photographer
      Previous Post Next Post

      RELATED ARTICLES

      LED Light Bar Buying Tips
      August 18, 2021 Blog

      LED Light Bar Buying Tips

      0
      Adding a Mini LED Light Bar to Your Off-Roading Vehicle
      August 18, 2021 Blog

      Adding a Mini LED Light Bar to Your Off-Roading Vehicle

      0
      Ultimate LED Light Bar Buying Guide
      August 18, 2021 Blog

      Ultimate LED Light Bar Buying Guide

      0
      How The RBG Remote Control Works
      July 20, 2021 Blog

      How The RBG Remote Control Works

      0
      Categories
      • Products
        • ALL LIGHT BARS
        • Light Bar Mounts
        • ALL LIGHT BAR COVERS
        • ALL INSERTS
        • ALL APPAREL
        • ALL ACCESSORIES
        • On Sale Now!
      • Shop By Jeep
        • Jeep JK
        • Jeep JL
        • Jeep JT
      • Dealers Sign Up
      • Dealer Login
      • Contact
      • Reviews
      • Accessories
      Social
      • Twitter
      • Facebook
      Tags
      • All
      • Aerolidz Insert
      • Aerolidz Light Bar
      • emergency
      • emergency SOS
      • Jeep
      • off road
      Aerolidz
      10884 HWY 21 ,
      Hillsboro MO 63050
      (314) 279-5636 Mon-Fri 9 AM to 5 PM
      sales@Aerolidz.com
      JOIN US:
      ABOUT AEROXINDUSTRIES

      AeroX Industries is an up and coming lighting and accessories company that is developing innovative products for the automotive industry.

      Our engineering team is comprised of some of the most talented engineers in the industry. Our ability to take an existing product and make it better is second to none. Rest assured the quality products that you receive from us have been tested by our followers, friends, club members and AeroX Family.

      We stand 100% behind our products if you are not happy with it let us know and we will make it right. Made in the USA

      INFORMATION:
      • About
      • Contact
      • FAQ
      • Installation instructions
      • Privacy Policy
      • Shipping Policy
      • Warranty Inquiries
      • Blog
      • Approved Logos
      • Videos
      DEALER INFO
      • MAP Pricing Policy
      • Dealer Terms & Conditions

      SHOP BY VEHICLE
      • JEEP LIGHT BAR
      • ATV LIGHT BAR
      SIGN UP TO OUR NEWSLETTER

      Subscribe to our Newsletter and get bonuses for the next purchase

      © 2023 Aerolidz | All Rights Reserved | Designed By Notch Solutions

      Product successfully added to your Shopping Cart

      Continue Shopping
      Proceed to Checkout

        Sample Product

        • Twitter
        • Facebook
        • Google+